Recently added
How to make linocuts

How to make linocuts ?

Linocut is a very accessible relief printing technique that requires little equipment and few prerequisites to get started. So in this article we will review what you need to know to be able to start block printing on your own. If you don’t have any material yet, I invite you to consult my article for choosing your block printing equipment
.

Now that you are equipped, it is time to get started! You will have to decide if you want to make monochrome or multicolor lino prints. Indeed, the preparatory work will not be the same in one case as in the other.

If you are a beginner in linocut I advise you to start with a simple black and white print to understand the technique and to familiarize yourself with it. You can then add colors and gradients to your creations.

Making a monochrome linocut

Linocut being a relief techniqueyou will have to remove the parts you do not want to ink. With your gouges, you can create contours, create textures, simulate gradients etc. These are all techniques that will give your print some character.

In monochrome you will only have to cut the desired white areas for printing without worrying about the rest. When you want to make a linocut with several colors, it will require a little more work as we will see.

Making a multi-color linocut

Several technical aspects will be added to the monochrome technique to obtain a print with different colors. We will see below the different possibilities to achieve the desired result.

You have two options for multi-color printing:

1. Engrave several linoleum sheets

When you want to get a lino print with different colors, and you want to keep the work for reprinting, color changes or even design changes, you should opt for this technique. It will be a question of having one support per color. If colors are quite far apart on your composition, you can process them on a single support with proper rollers. But if the colors are too close, then it will be necessary to have different supports and thus to engrave several different plates.

2. To make a reduction engraving

Here the technique is opposite in that little by little you destroy your composition as you print and change colors. In the manner of successive layers, you will start by printing the background and then as you engrave and print, you will cut your linoleum until you obtain the details and fine contours for example. This will also require as many prints as colors on your composition. You will have to be patient to finish your linocuts if your inks dry slowly, hence the interest of choosing the right inks for block printing.

Get a perfect alignment of your colors on your linocut

Whether you choose one of the above techniques, you will need to consider the proper alignment of the substrate and paper with each print so that the colors transfer exactly where you want them to, otherwise the print will be a failure.

For this you can invest in the famous Burton pins, or make a wooden or cardboard frame with tape and rhodoid. It works perfectly and it doesn’t cost anything…

Transferring your creation to linoleum

You know what you want to engrave but there is still a big problem. How to reproduce your design on your linoleum sheet and in reverse. Well, there again you will have the choice between several techniques if drawing directly does not tempt you. There are really many solutions to transfer a drawing or even a photo on linoleum but I will only focus on those that give the best results.

Transfer to linoleum with tracing paper

If you don’t feel like drawing directly on the linoleum, you can transfer it with the tracing paper. You will need to draw once on the tracing paper and, once finished, iron the lines upside down in order to transfer them to your linoleum sheet. Classic and tedious you may say, but it requires little material.

Transfer to linoleum with carbon paper

Here you will place your sheet of carbon paper between your linoleum board and your drawing sheet. Make sure to attach them to each other to avoid any misalignment. And then, you will only have to go back over a drawing already made or let your imagination run free. The advantage here is that the carbon sheets can be used several times.

Transfer to linoleum with polycrylic

polycrilic linocut material

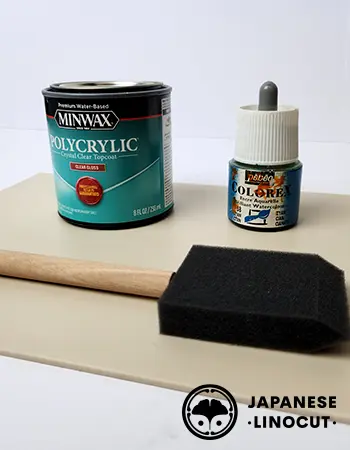
Here we will talk about photo transfer or laser printing on linoleum for example. With the help of polycrylic you will be able to transfer your creations on any support like wood, metal etc. We often see bindex or liquitex acrylic medium used to transfer our creations on linoleum, but honestly, polycrylic is much better.

Apply a very thin layer with a polycrylic foam brush on your linoleum and then apply your laser print on top. Blow away the bubbles with a plastic card and let it dry for a handful of hours with a weight on it.

If you used glossy label sheet, you won’t have to do anything, your design will transfer perfectly to the lino.

If you don’t have any and you want to print on classic paper just dampen the paper and make circles with your fingers to remove the paper so that only the print remains on the lino. Don’t try to remove everything at once.

I recommend going gradually. Once the paper is gone, let it dry and rewet it again by rubbing to remove the remaining paper film.

Proceed in this way until the lino is impeccable once dry. It takes much longer than the glossy paper version but it works very well too.

If you are patient and careful, this technique allows you to obtain an impeccable result.
If you have other effective solutions to share, please feel free to share them with us in comments.

Engrave your design on linoleum

how to sharpen your linocut gouges step 9Your creation is now on your linoleum and all you have to do is engrave it. Start with sharpen your gouges in order to have nice lines and curves, to engrave more efficiently and to avoid hurting yourself while engraving.

Remember that in block printing, the more a blade cuts, the less force is used and therefore the risk of the blade slipping is greatly reduced.

Therefore, make regular trips to your sharpener throughout your carving to keep your tools sharp at all times.

Before engraving, I suggest you add a layer of color to the entire linoleum so you can see exactly what you have already engraved. Personally, I add either water-based ink or a few drops of colorex to my lino.

Each time you start carving, I recommend making a few curves and lines on parts that will be hollowed out to make sure you have the tool positioned properly in your hand.

Then start with the contours and details with fine gouges and work your way up to remove the larger parts later. Be meticulous and patient while engraving the linoleum plate. Remember also that it is not so much the completion of the print that counts but the whole journey. Each stroke must be mastered and executed with care and seriousness.

Print your linocut

That’s it, you’ve finished engraving your linoleum and want to move on to printing. For this, I suggest you use a water-based ink that can be easily cleaned up because not everything will be perfect immediately.

Spread a stream of ink the length of your roll on a glass plate or smooth surface. Start by working your ink a little with a knife if it wasn’t smooth enough. Then, put some on the brayer and go back and forth for a while so the ink is easier to spread and the ink film is thinner on the roller. Make a first inking of the lino plate and put your paper on top. If you have one lino printing press use it, otherwise use a baren to apply pressure to your sheet.

Insist on the pattern to make sure it is reproduced. You can use the back of a small spoon on areas that need more pressure.

Then lift up your sheet and see if there are any areas left to hollow out. Sometimes the brayer touches areas that are supposed to remain white. If you are using water-based paint, you can also wipe off unwanted ink marks with a damp cloth before printing. You can also use a paper mask placed between your linoleum and your sheet so that the hollowed out areas remain white when printed.

When your tests are conclusive, then you can use the paper and ink of your choice for your linocut.

If you have any questions, feel free to post them in comments, I’ll be happy to help you. And by the way, if you have any tips, don’t hesitate to share them with us!

Leave a Reply

Your email address will not be published. Required fields are marked *

This site uses Akismet to reduce spam. Learn how your comment data is processed.

Free shipping

Free shipping

Numbered handcrafted creations

Numbered handcrafted creations

Secure payment

Secure payment

Careful packaging

Careful packaging